How to Add Your Website on Google Search Console + Step-by-Step Guide

Hello friends, I am Keleis Andre, and I specialize in SEO. Today, I want to discuss a practical topic: How can we register our site on Google? Google Search Console is one of the websites and completely free web-based software that provides excellent and helpful features for managing your site. To register a site on Google, you must use Google Search Console. Join us in this article to thoroughly discuss Google Search Console, how to use it, and how to register a website.
How to Add Your Website to Google Search Console
If you are new to Google Search Console, you must add and verify your site before doing anything else. This proves that you are the owner of a site, a webmaster, or a blog owner. The way to register a site on Google Search Console is as follows.
Step One: Log in to the Google Search Console website
In the first step, enter your Google account through this link (https://search.google.com/search-console/about). You can create one for free if you do not have an account. If you already have an Analytics, Adwords, or Gmail account, you can use them. On the opened page, click on the Start Now option as shown below.

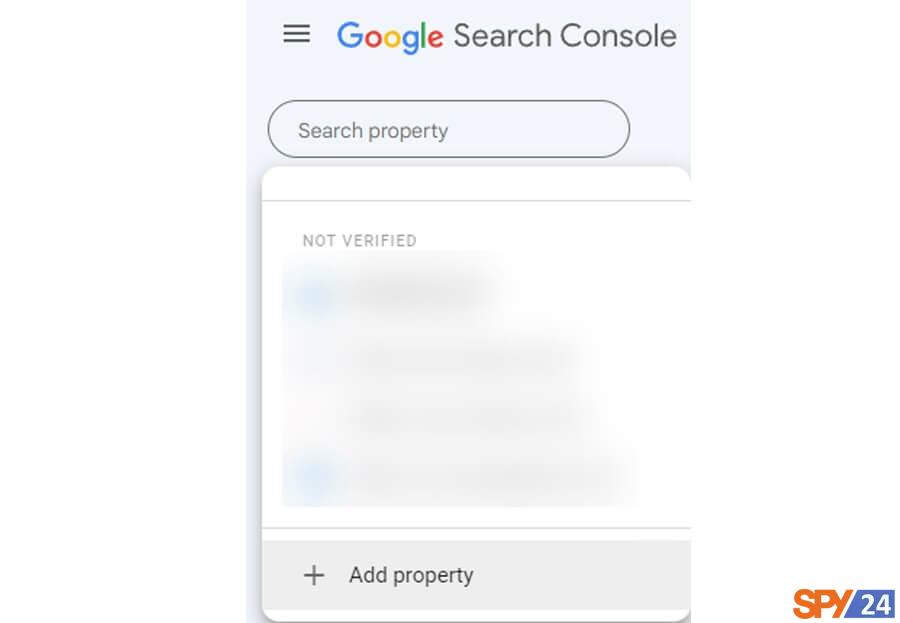
Step Two: Select the ‘Add a Property’ option
To register your site on Google Search Console, on the recently opened page for you, click on the ‘Add Property’ option. The way to access this option is shown in the figure below. You can add up to 1000 properties to your Search Console account.
Step Three: Choose the method of connecting the site
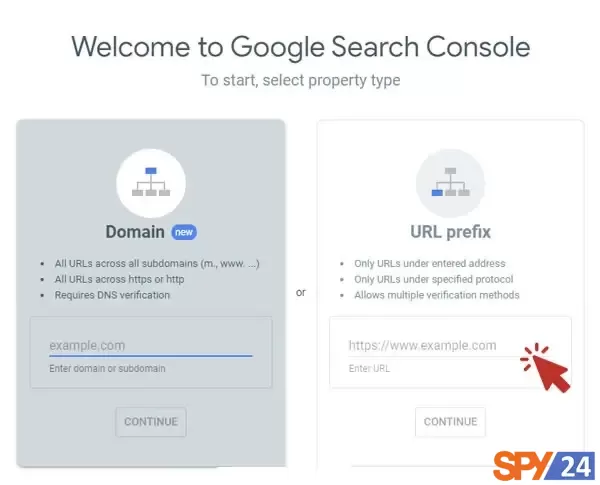
In this section, you must choose how to register your website on Google Search Console. As you can see in the figure below, there are two methods to do this:
- Method Domain
- Method URL Prefix
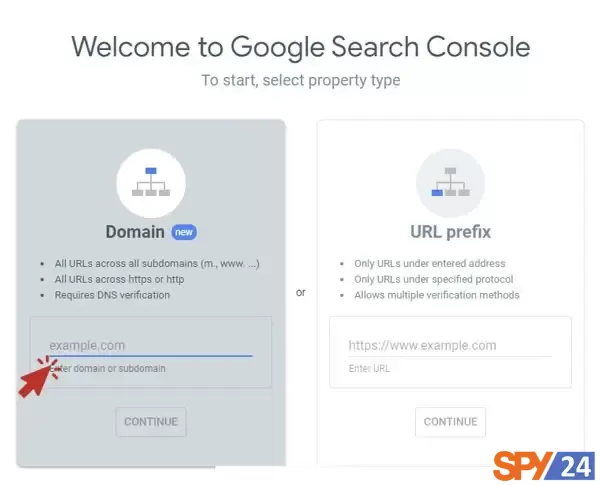
In general, the Domain method has more flexibility for registering a site on Search Console, but you need to use DNS to use it, which may be a bit harder for some people. However, in the continuation of this article, we explain both methods.
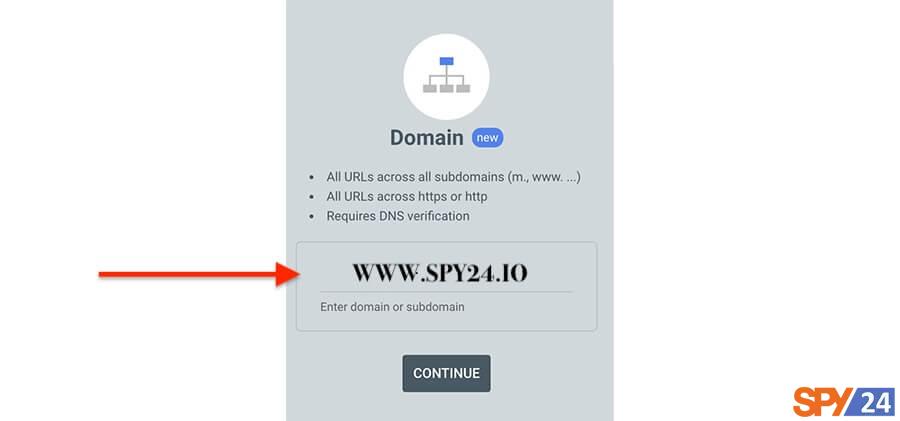
1- Using the Domain method to register a site on Google Console
First, enter your website address in the relevant section. Remember that in this section, you should not enter the type of protocol the website uses (HTTP or HTTPS). The correct way to enter the domain name is shown in the figure below.
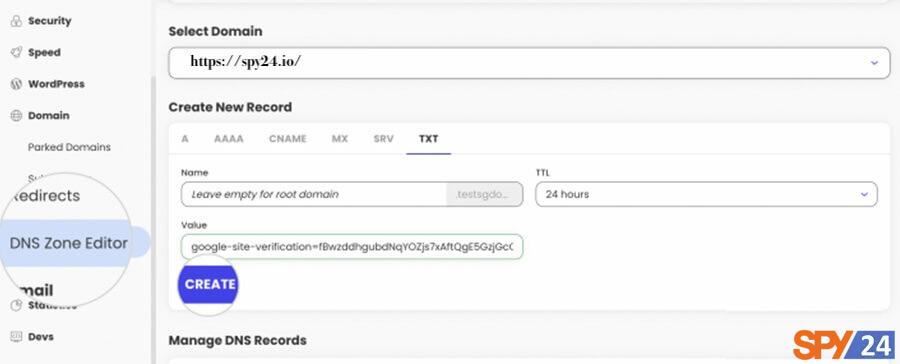
Then click on the ‘Continue’ button. In this way, the Search Console will create a TXT record for your domain and copy this record.

Now, you need to add the copied record to the DNS settings configuration of your domain. The figure below shows how to do this, although depending on which company you have received your domain services from, the location of these options may be slightly different. After adding the record, you must wait for the changes made to your domain to be saved. This usually takes less than a few hours. Afterward, you can return to the Search Console and continue the steps.
Click the’ Verify’ button to test whether your domain’s DNS settings have been registered.
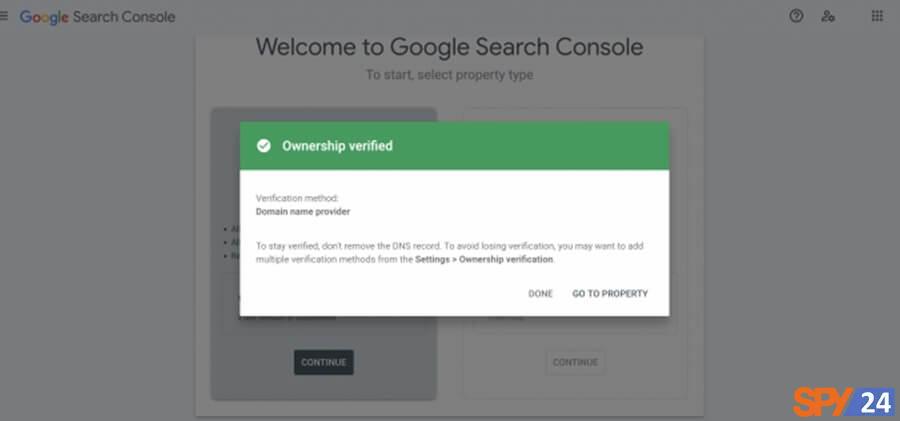
If the settings have been completed, Google will inform you of this with a message. This way, you will be one step closer to registering your site on Google Search Console. You will face the message below if the registration process is incomplete.

If, after a few hours, you still face this message, it is better to use the following method and perform the process of registering the site on Google Search Console.
2- Using the URL Prefix method to register a site on Google Console
If, for any reason, the Domain method does not apply to you, you can use the URL Prefix method to register your site on Google Search Console.
To start, enter the full name of your website in the URL Prefix and click on the ‘Continue’ button. Note that in this section, too, you should enter your website address with www and the type of protocol you use.
Step Four: Website Owner Verification
In the next step to register the site on Search Console, you must somehow prove your domain ownership to Google. Remember that by connecting your site to Google Search Console, you gain access to essential and sensitive information from the website, so you need to specify that you are the website owner.
There are various methods to do this, which we will explain in the following.
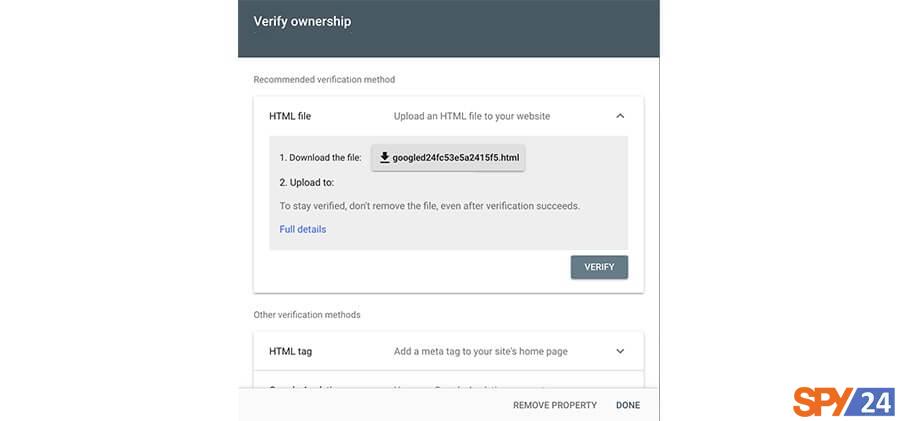
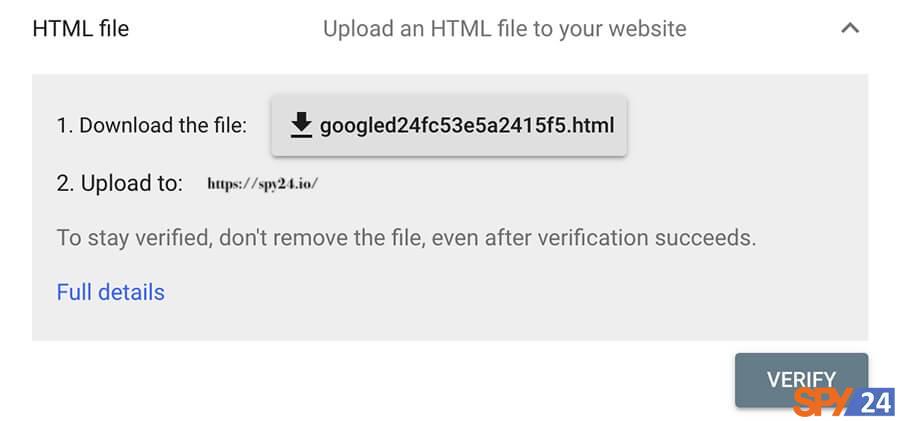
1- Adding an HTML file to the website
The first method to verify website ownership is the HTML File method. In this method, you need to download the introduced HTML file and upload it to your website. After this, click the ‘Verify’ button to register the site on Google Search Console.
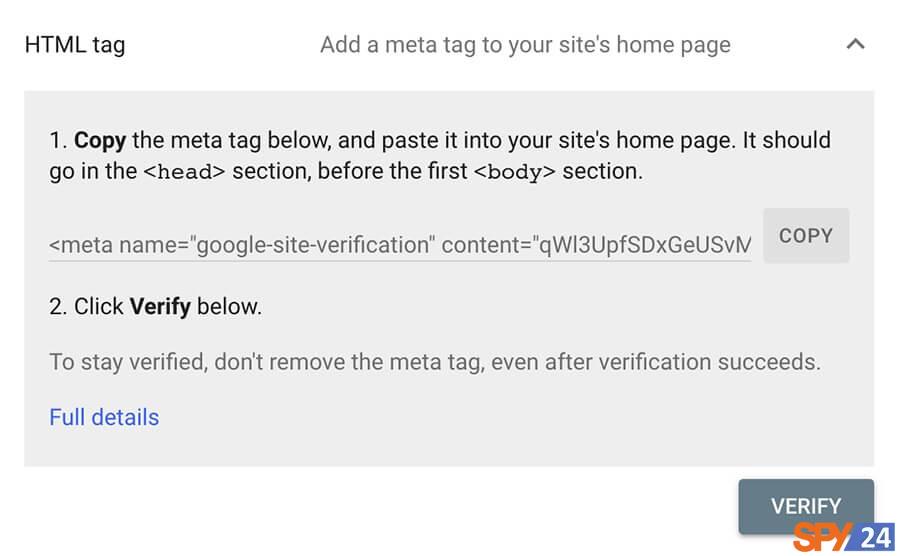
2- Adding an HTML tag to the main page of the website
The second method for verifying domain ownership is using an HTML tag. You only need to copy the written meta tag and place it in the <head> section of the website’s main page and before the <body> section. To confirm, you need to click on the ‘Verify’ button.
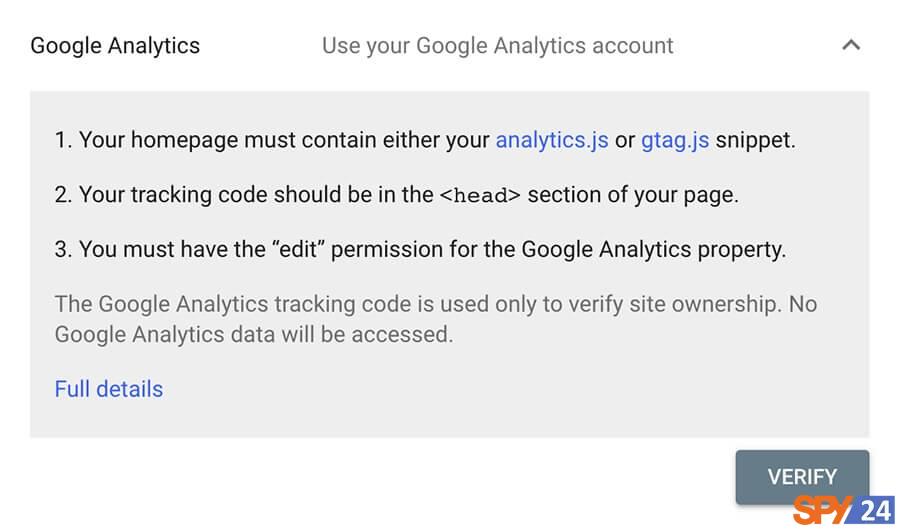
3- Using Google Analytics
Another solution that you can use to prove that you are the domain owner is to use Google Analytics. The only thing you need to do is to log in to Google Analytics and click on the ‘Verify’ option.
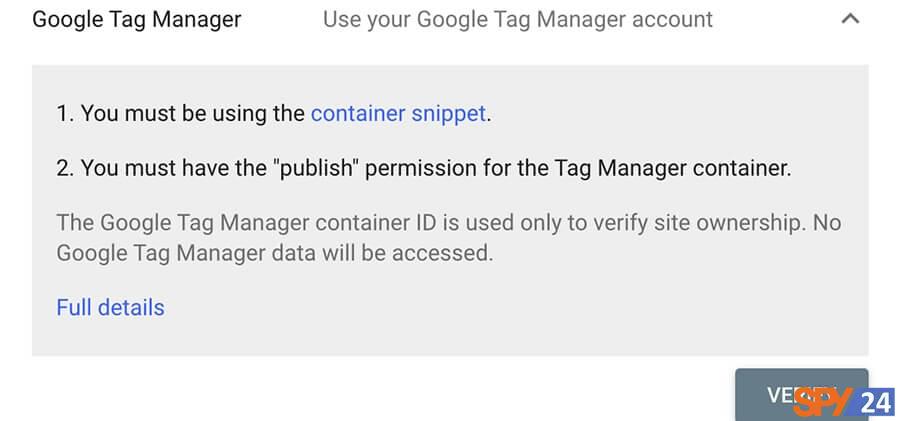
4- Using Google Tag Manager
You can also use Google Tag Manager to register a site on Google Search Console. If you use this Google Tag Manager on your site, this option can be easier than other options. Also, remember that to use this method, you must have Publish access in the tag manager container.
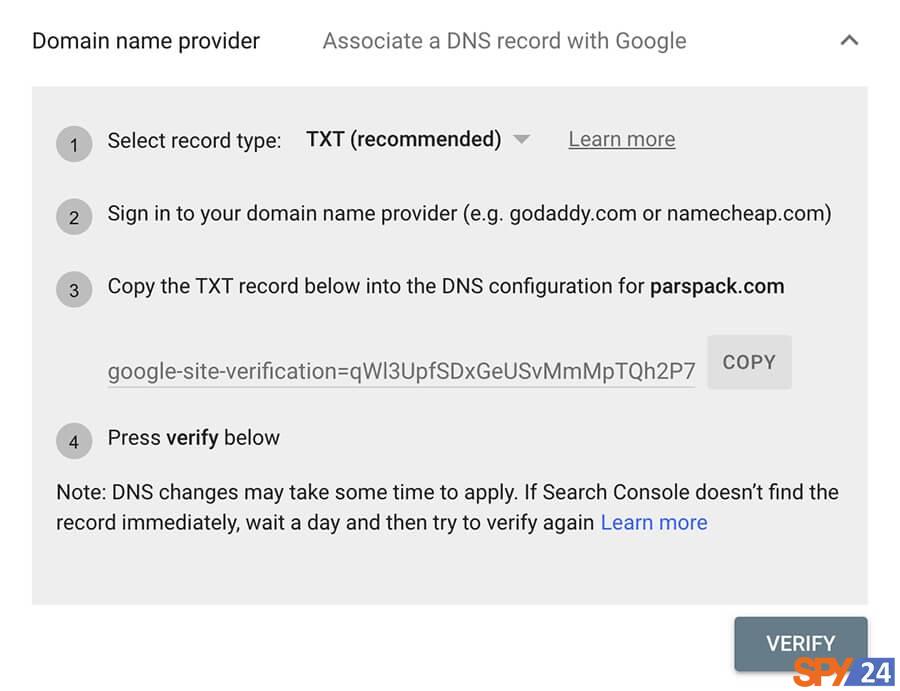
5- Using the facilities of the domain service provider
The last method for verifying website domain ownership is to use DNS settings. We have explained how to use this method in previous sections of this article. You can use this method to verify the ownership of your website domain.
How to Add a WordPress Site to Google Search Console
How do I add a search console to WordPress? Connect your WordPress site to Google’s search console according to the tutorial below.
Method 1: Using the Yoast SEO plugin to create a WordPress search console
Many WordPress sites use the Yoast plugin for their internal SEO analysis. This plugin has many features, allowing you to verify site ownership for your Google Search Console account.
To see how to connect Google’s search console to the Yoast SEO plugin, you must first install and activate this plugin. If you have this plugin, an option called “SEO” appears in the dashboard menu of your WordPress site next to the Yoast plugin icon.
Hover over the SEO option and then click on “General” to enter the general settings page of the Yoast plugin.

You should select the “Webmaster Tools” tab from the 4 tabs above on the new open page.
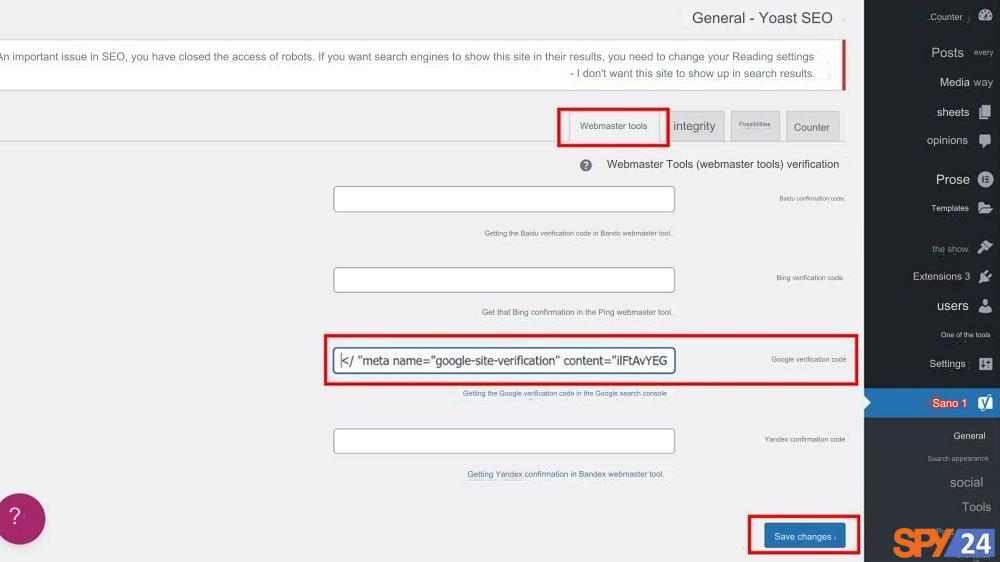
You must put the HTML tag you copied from the search console on this page in the “Google verification code” box. Be careful that nothing has been added to the beginning or end of the tag. Even a space can cause an error for site ownership verification.
Finally, don’t forget to click the “Save Changes” button at the bottom of the page after entering the HTML tag. After saving the changes, we return to the search console page and click the VERIFY button.
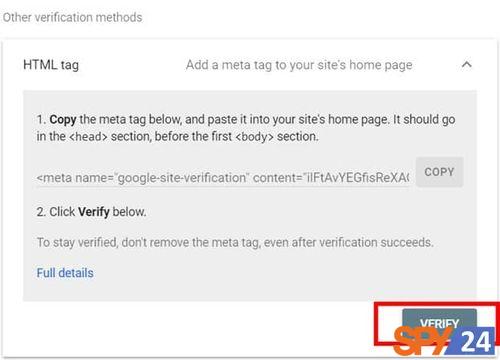
If everything has gone right, you will see the green color site ownership confirmation message, and you can use the search console. 🤗
Method 2: Insert Headers and Footer plugin for installing Google Search Console
If the Yoast plugin is not installed on your site and you ask how to add a search console to WordPress, we suggest a straightforward plugin. This plugin is the best choice for people who do not want to use SEO plugins so that the site speed stays the same.
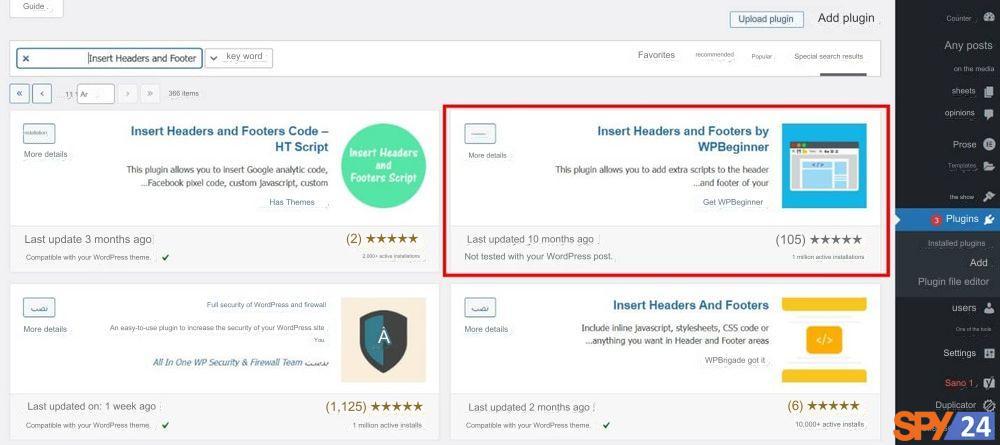
You have probably heard the name of the Insert Headers and Footer plugin. The job of this plugin is to place HTML tags in different sections of the site, such as the <head>, <body>, and <footer> sections, without needing to have programming knowledge and knowing how to add tags to the site.
To install this plugin, enter the “Plugins” and “Add” sections and search for Insert Headers and Footer. Install and then activate the plugin with over one million active installs.
After the plugin is installed correctly, an option called Insert Headers and Footer is added to the “Settings” section in the dashboard menu.
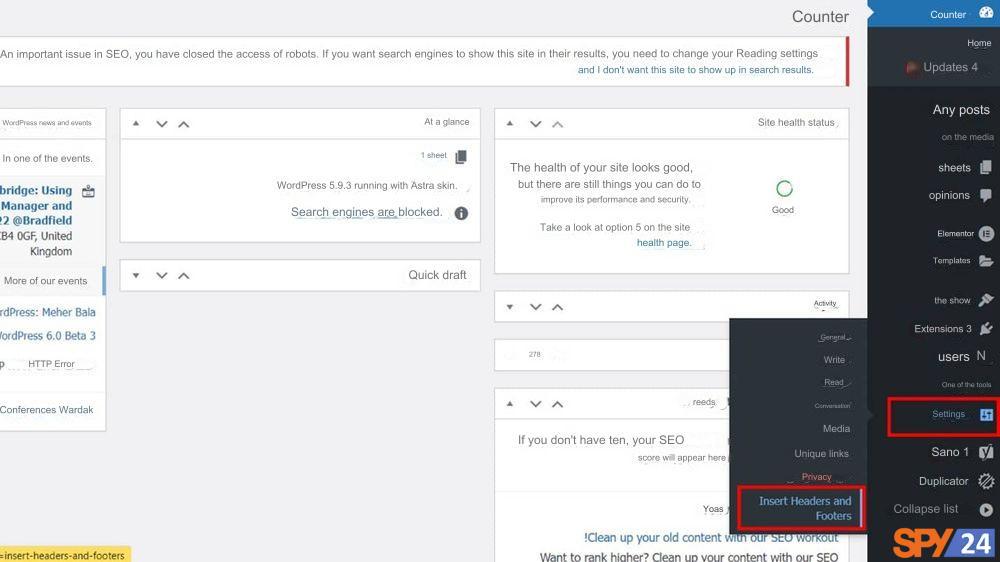
Now, you must enter this section and add the HTML tag you copied from Google Search Console to the first box, i.e., the head section. Remember to scroll down the page after adding the tag and click the blue save button to save the changes.

In response to the question “How to add a search console to WordPress?” you need to go back to the Google Console page and click on VERIFY to see the green color site ownership confirmation message, and done! ☺💪
Method 3: Rank Math plugin for connecting WordPress to the search console
In this part of the video tutorial for registering a WordPress site in Google Search Console, we reach the popular Rank Math plugin, which, like Yoast, allows you to verify the ownership of WordPress sites.
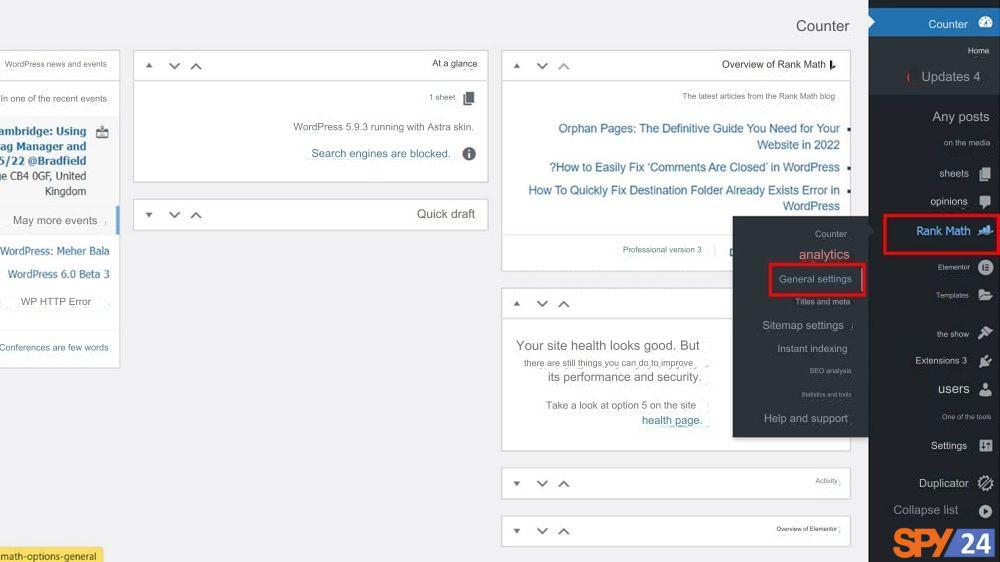
If you have installed this plugin on your WordPress site, you should see an option called “Rank Math” from the site dashboard menu. Hold the mouse over this phrase and click the “General Settings” option.
Now, on the open page, you must select “Webmaster Tools” and paste the HTML tag you copied in the “Google Search Console” box.
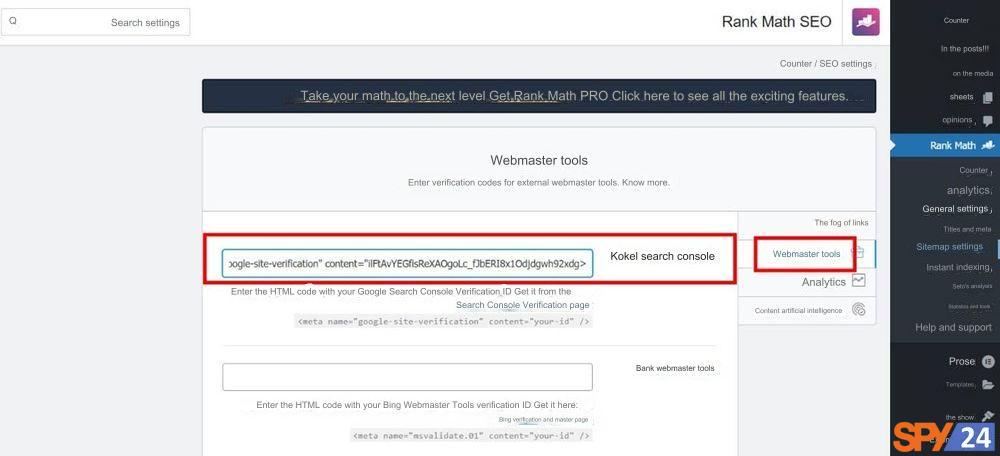
After pasting, scroll the page to reach the “Save Changes” button. After saving, like the previous methods, we return to the search console page and hit the VERIFY button to complete creating a search console for WordPress with success and a beautiful green message. 😉
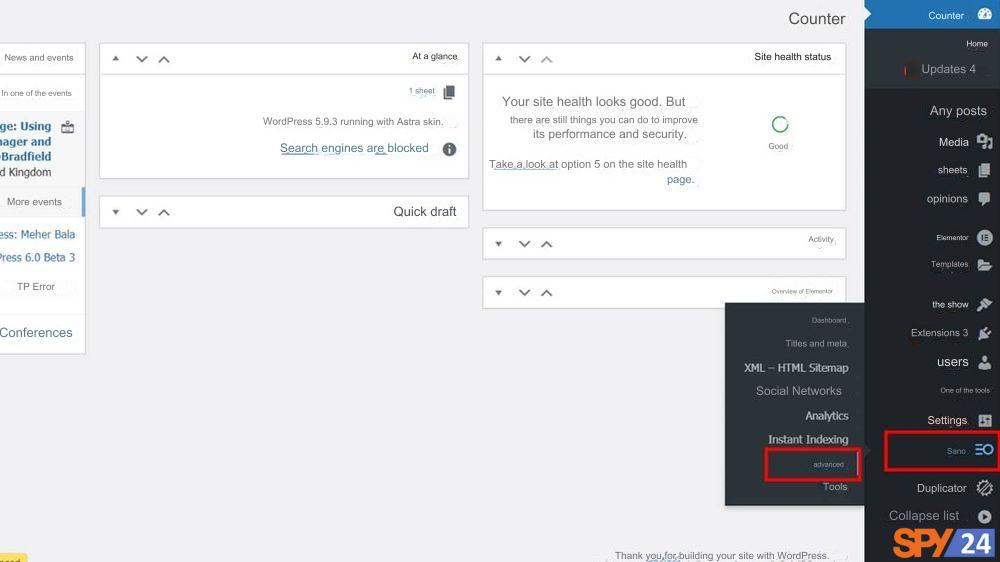
Method 4: SEOPress plugin for confirming the creation of Google Search Console
Another way to answer how to add a search console to my WordPress site is to use the SEOPress plugin. The SEOPress plugin, like Yoast and Rank Math, is designed to review the internal SEO of WordPress sites.
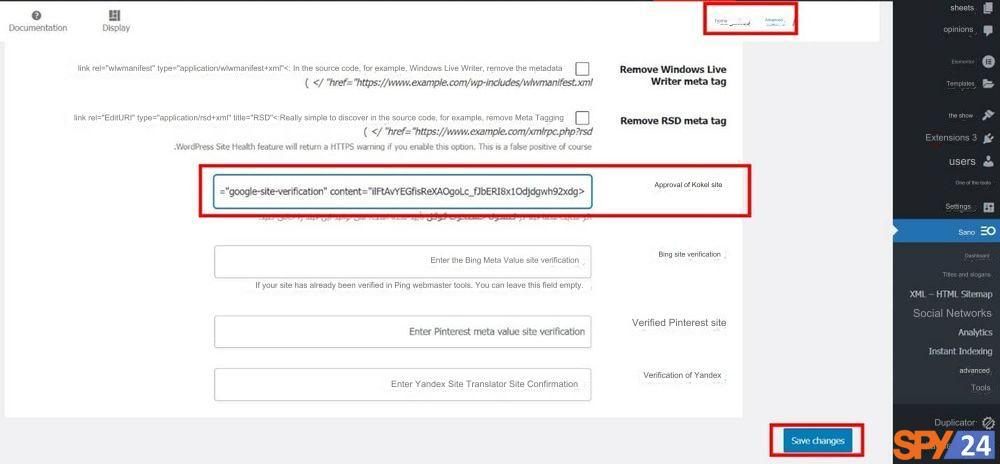
When you install and activate this plugin, an option called “SEO” with the icon of this plugin is added to the site dashboard menu, and to add the Google Search Console HTML tag, you need to enter the “Advanced” section of this plugin.
In the page that opens, select the “Advanced” option from the right and scroll down the page, that is, to where the “Google Site Verification” option is. Now, all you have to do is enter the HTML tag of the search console, click on the Save button, return to the search console page, and hit VERIFY.
Method 5: Site Kit by Google plugin for installing Google Search Console
In this part of the video tutorial for registering a WordPress site in Google Search Console, we will cover the popular Site Kit plugin that Google has designed. You can use it both to confirm site ownership and see data and statistics related to Google tools such as Analytics and Search Console in a dashboard it creates on your site. 👀
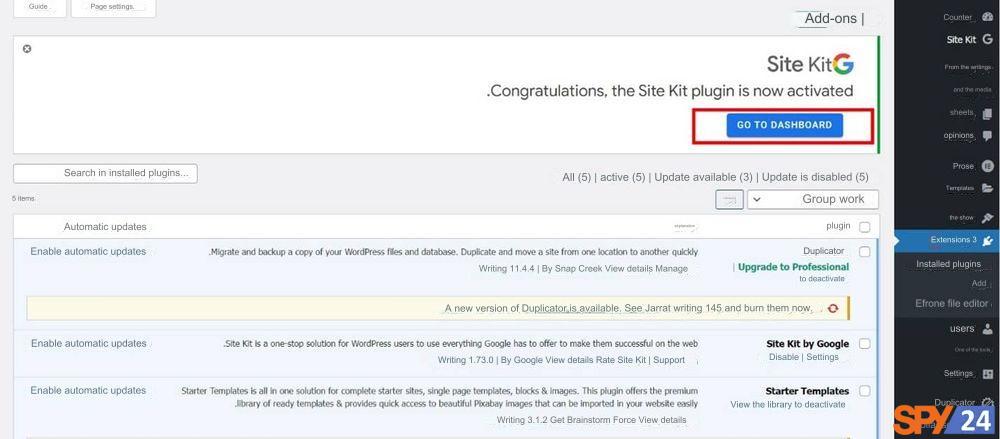
To use this method to connect WordPress to the search console, you need to install and activate the Site Kit using the Google plugin. After activation, you will see the page below, and you need to click on the blue GO TO DASHBOARD button. If you do not see this page, select the Dashboard option from the Site Kit option that has been added to the dashboard menu.
By clicking this button, you enter a page where the plugin asks you to log in with your Google account. So be aware that this plugin will be helpful to you when you have created the search console or other Google tools with a Google account so that you can confirm them without hassle.
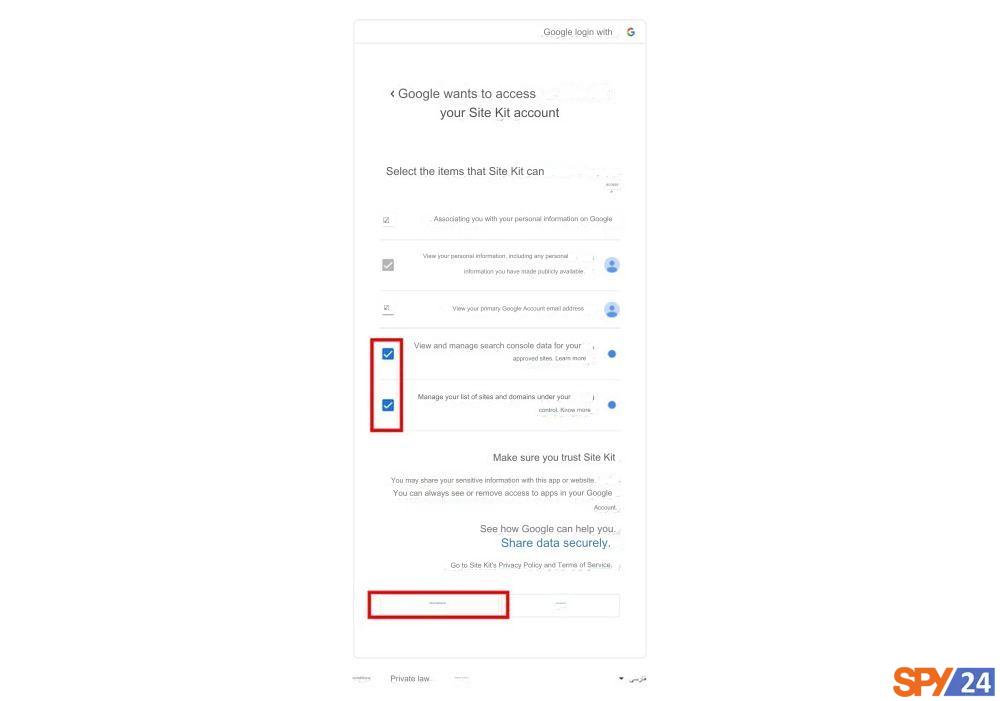
For the synchronization steps of the Google account to go correctly, activate all access options and click the “Continue” button to start the search console account confirmation steps. On the next page, you only have to click on the blue “Proceed” button.
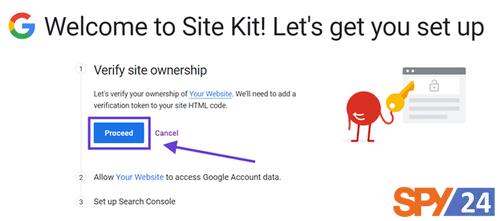
After following the steps and allowing the plugin to access your account information, a message shows that the Google Search Console account has been successfully connected to the WordPress site.
Now, you can go to the dashboard section of this plugin and see all the statistics related to the Search Console tool. 😎

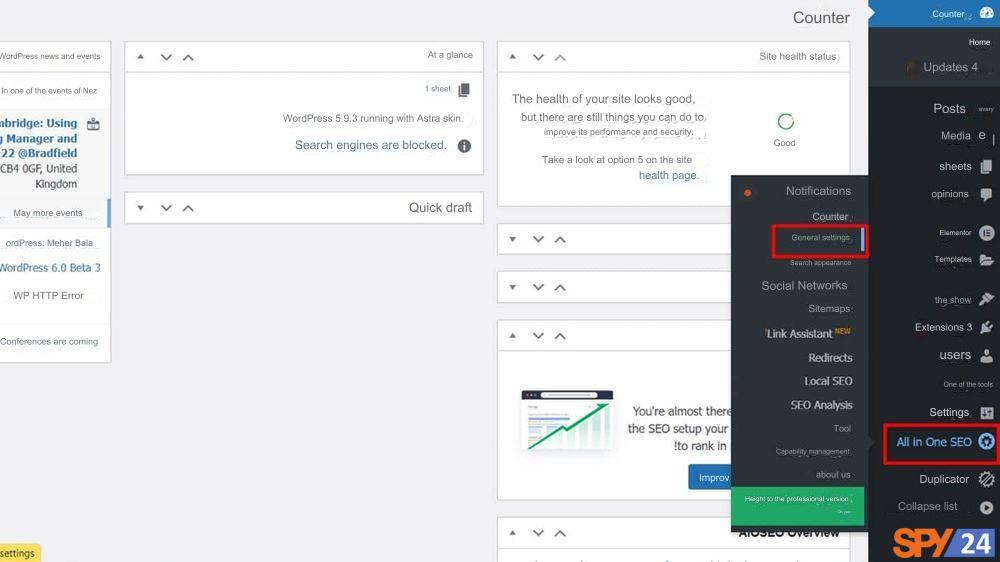
Method 6: All-in-one SEO plugin for installing WordPress search console
Another way to see how to add a search console to WordPress is to use the All in one SEO plugin. This plugin is one of the most popular and powerful SEO plugins, with over 3 million active installs.
After installing and activating the plugin, an option called “All in One SEO” is added to the WordPress dashboard menu, and when you hold the mouse over it, you can see the “General Settings” option and click on it.
In the new page that opens, you should select the Webmaster Tools tab, and from among the different sections, click on the Google icon or the Google Search Console to allow you to enter the HTML tag of the search console. After entering, you only have to click the Save button at the bottom of the page to finish the job.
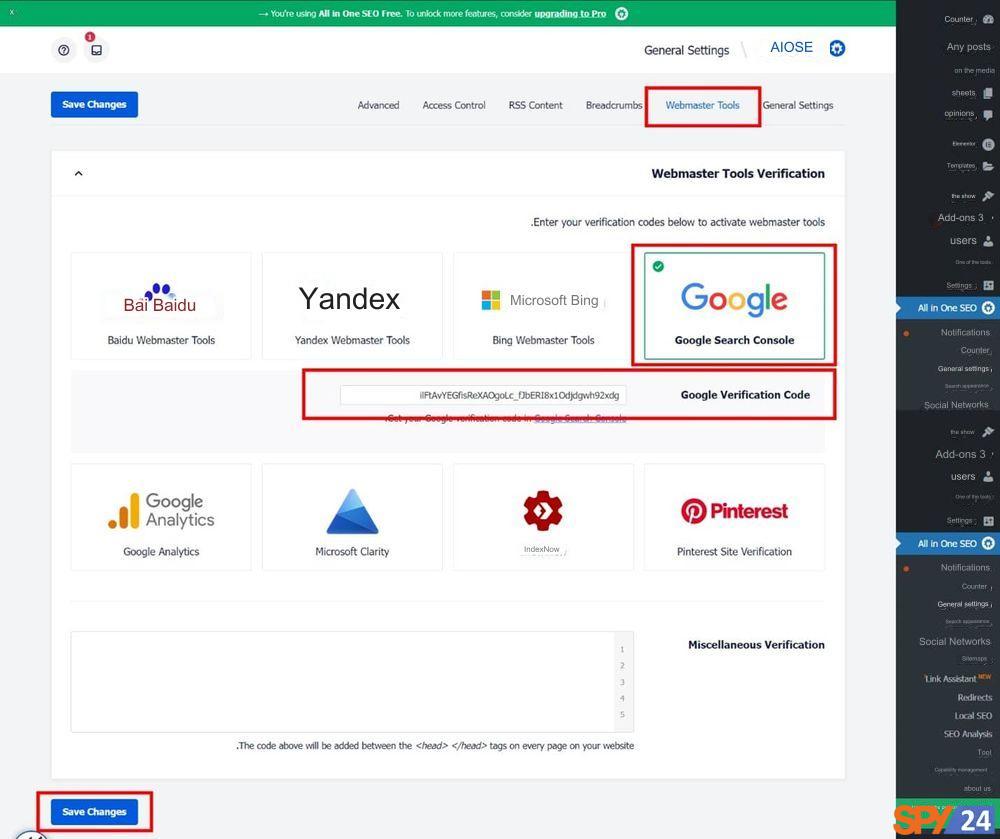
Now, like other plugins that allow the creation of a search console for WordPress, we return to the search console page and click on the VERIFY button to confirm site ownership so that the green success message appears. ☺
Creating and setting up XML site maps
Once your website is verified, the task you need to do is to create a site map. Then, register the site map from the sitemaps section. After completing this task, it may take some time for the site data to be displayed for Google.
After verifying your site, go to SEO > General > Features and turn on the XML site maps option. To view the site map, click the question mark next to the XML site maps field and click the view site map link.
In the final step, log back into your Google Search Console account and select your site. Then go to the Crawl /Sitemaps section on the left, click the Add / Test Sitemap button, and add your Sitemap URL.
With this ease, your links will be displayed on Google after a few hours, and you can receive free visitors forever! 🙂 Be triumphant and victorious.
Conclusion:
Registering a website on Google Search Console is one of the things that every SEO expert, as well as website developers, should learn how to do. This free tool from Google provides information that can help you understand how Google evaluates your website. This information is so important that it could be considered as having an answer sheet at the exam session. In this article from the series of SEO training articles on the SPY24 blog, we introduced you to two easy ways to register a site on Google Search Console. If you have any questions or problems while doing this, you can share your comments and problems with us in the comments section.
Frequently Asked Questions
What should be done to connect the site to Google Search Console?
The first thing you need to do is choose the method of connecting the site to Google Search Console and prove your domain ownership in the next step. There are different methods to prove ownership, all explained in this article on the Pars Pack blog.
What are the benefits of registering a site on Search Console?
To raise the rank of your website in Google results, you need to know what Google thinks about your website. Registering a site on Search Console will give you the information you need for this purpose.
Will our site be displayed on Google three days after registration?
After registering a website on Google, there is no guarantee that your website will be directly displayed in Google search results. Writing a website only helps Google to find and index your website.
After registering a website on Google, Google needs to find your website, visit it, analyze its content, and recognize it as suitable for display in search results. This process is known as “crawling” and “indexing” and takes time, depending on Google. Therefore, after registering a website on Google, you cannot expect your website to be immediately displayed in search results. Usually, this process takes 3 to 7 days for your website to be displayed in Google search results. So patience is essential. After 3 days of registering a website, you can check its status, and if it is not yet in the search results, consult with the website manager.